MQTT to JSON HTTP Logger
This guide will help you setup an MQTT broker and HTTP server that logs all published MQTT data to a local database, and exposes the data in JSON format over HTTP. An AWS EC2 instance running Ubuntu Server 14.04 will be used here, but a Raspberry Pi would also work fine.
Table of Contents
- What is MQTT?
- Objectives
- System Requirements
- MQTT-Log Source
- Server Setup
- Starting MQTT-Log as a PM2 Process
- Managing the MQTT-Log/PM2 Process
- Testing the System
- Credits
What is MQTT?
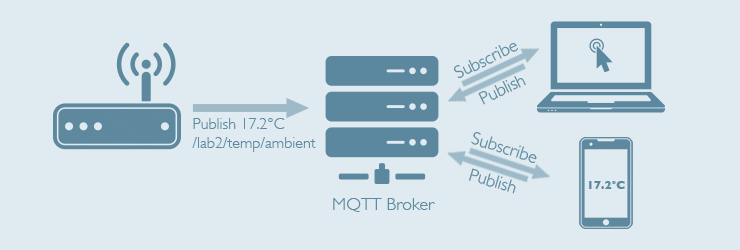
If you’re not familiar with MQTT it’s a light-weight publish-subscribe protocol that sits between sensor nodes on one side, and various data subscribers on the other.
It allows you to decouple the data provider(s) from the data consumer(s) in a scalable, flexible manner, and with a minimum of complexity.
MQTT uses a key-based system, where records are stored and accessed via a key
called a topic.
Topics are hierarchical strings in a similar format as HTTP requests or file and folder names:
- home/kitchen/fridge/temperature
- home/kitchen/fridge/luminosity
- office/secondfloor/kitchen/temperature
By publishing to a topic, you overwrite the previous value, and any device that has subscribed to that topic will receive an alert letting it know that the topic has changed, along with the updated value.
Each topic can have multiple publishers or subscribers, and new subscribers can join or leave at any moment.
Publishers can also be subscribers at the same time, meaning that communication can happen in both directions using any number of topics and involving any number of endpoints or sensor nodes.
Objectives
There are a variety of excellent platforms out there that are based on or use MQTT (Adafruit IO, etc.).
If you simply want to setup a quick test platform to capture MQTT publications, though, and make sure the data is arriving properly, the existing open source or proprietary services might be more complicated than you want or need.
This guide tries to provide the easiest possible solution to:
- Setup an MQTT Broker that can be accessed from anywhere
- Record all published data in a local database, including historical data
- Expose all published data for a specific topic in JSON format via HTTP
System Requirements
This guide was tested using a clean t2.medium AWS EC2 instance running Ubuntu 14.04 Server, although a Raspberry Pi or any other similar Debian-based computer should also work fine.
The tutorial assumes that you have shell access, that the server has internet access, and that you have already opened up the following ports (if you plan to access the system remotely):
- 1883 - MQTT access
- 8080 - HTTP requests
Details aren’t provided here on configuring the Security Group for incoming and outgoing traffic, or the DNS setup if you want to redirect a domain or sub-domain to your server. Google should be able to help you there.
MQTT-Log Source
The node.js utility that runs the MQTT broker (aedes), writes the code to the database (nedb), opens the HTTP Server and supplies the JSON data is shown below is available on Github.
Latest Source: https://github.com/adafruit/mqtt-log
The code below is purely for illustration purposes and may be out of date! Always pull from the git repo for the latest updates.
Server Setup
To setup mqtt-log on a clean system, the following components are required or are highly recommended:
You may not be missing these on your own system, but they aren’t installed on a clean AWS instance running Ubuntu Server 14.04:
Build Tools (GCC, Make, etc.)
Install GCC and various build tools that you will need:
$ sudo apt-get install -y build-essentialsNode
Install node via the following command:
$ curl -sL https://deb.nodesource.com/setup_4.x | sudo -E bash -
$ sudo apt-get install -y nodejs
PM2 (Node Process Manager)
Install PM2, which is a helpful utility that can take node scripts and keep the service running as a daemon, restarting the service if it goes down, etc.
$ sudo npm install -g pm2Git
Install git to be able to easily pull the latest source code:
$ sudo apt-get install gitMQTT Tools (Optional)
To publish data to an MQTT broker from the command line the following Packages is very useful:
$ sudo npm install -g mqttInstalling MQTT-Log
Clone the latest copy of the mqtt-log repo via git:
$ git clone https://github.com/adafruit/mqtt-log.gitThen setup mqtt-log and any of it’s dependencies (aedes, nedb, etc.):
$ cd mqtt-log
$ npm install
Starting MQTT-Log as a PM2 Process
Now that mqtt-log is installed, we need to run it as a service via pm2.
pm2 allows us to automatically start the service at boot, and restart the service if it goes down. It hides the setup details, and exposes an easy to use management system for the processes it controls.
You normally only ever need to run through this process once!
Setup pm2
Before you can use pm2 you need to configure your system to load pm2 at startup and install some config files.
$ sudo su -c "env PATH=$PATH:/usr/bin pm2 startup ubuntu -u ubuntu --hp /home/ubuntu"This should give you:
[PM2] Spawning PM2 daemon
[PM2] PM2 Successfully daemonized
[PM2] Generating system init script in /etc/init.d/pm2-init.sh
[PM2] Making script booting at startup...
[PM2] -ubuntu- Using the command:
      su -c "chmod +x /etc/init.d/pm2-init.sh && update-rc.d pm2-init.sh defaults"
 System start/stop links for /etc/init.d/pm2-init.sh already exist.
[PM2] Done.
Start MQTT-Log via pm2
With pm2 up and setup on your system, you can start mqtt-log (index.js) as a pm2 managed process with:
$ pm2 start index.jsThis should give you the following results:
[PM2] Starting index.js in fork_mode (1 instance)
[PM2] Done.
┌──────────┬────┬──────┬──────┬────────┬─────────┬────────┬─────────────┬──────────┐
│ App name │ id │ mode │ pid  │ status │ restart │ uptime │ memory      │ watching │
├──────────┼────┼──────┼──────┼────────┼─────────┼────────┼─────────────┼──────────┤
│ index    │ 0  │ fork │ 1353 │ online │ 0       │ 0s     │ 13.246 MB   │ disabled │
└──────────┴────┴──────┴──────┴────────┴─────────┴────────┴─────────────┴──────────┘
 Use `pm2 show <id|name>` to get more details about an app
Persist the MQTT-Log process
Once the process is running (and not before!) you need to save it, which means
that pm2 will restart anything running on the host when the save command was
sent:
$ pm2 saveSidenote: Resolving EACCES Errors
You may get EACCES errors in one of the above steps or after reboot, such as:
events.js:141
      throw er; // Unhandled 'error' event
      ^

Error: connect EACCES /home/ubuntu/.pm2/rpc.sock
    at Object.exports._errnoException (util.js:870:11)
    at exports._exceptionWithHostPort (util.js:893:20)
    at PipeConnectWrap.afterConnect [as oncomplete] (net.js:1063:14)
This is typically because you started pm2 via sudo (sudo pm2 start ubuntu),
though there may be other issues with user account configuration with pm2 and
Ubuntu 14.04 on EWS as well. See for example:
If you see these errors or if pm2 isn’t persisting across system resets check
the owner of the ~/.pm2 folder via:
$ ls -la ~/This will show you who owns the ~/.pm2 folder (the first user is the owner, the second is the group):
drwxr-xr-x 4 ubuntu root 4096 Dec 29 16:10 .pm2If the folder is owned by root, you can change the access rights to the .pm2
folder to give the ubuntu user control of it again via:
sudo chown -R ubuntu ~/.pm2You may need to remove the pm2 config files and set things up again:
sudo rm -rf ~/.pm2
sudo rm -rf /etc/init.d/pm2-init.sh
sudo su -c "env PATH=$PATH:/usr/bin pm2 startup ubuntu -u ubuntu --hp /home/ubuntu"
Managing the MQTT-Log/PM2 Process
Updating the script
If you make any changes to the mqtt-log script, you should restart pm2 with the changes as follows.
For example, to (optionally) pull the latest version of the source:
$ git pullThen restart the process so that any changes take effect:
$ pm2 restart allStopping the process
To stop the service you can run the following command:
$ pm2 stop allIf you no longer want to run the script at startup run:
$ pm2 delete all
$ pm2 update
Check the process status
You can check the current state of pm2 managed processes via:
$ pm2 listYou can also look at utilities like htop to see the entire system status, including pm2 managed processes.
Deleting the MQTT database
If you want to delete all of the historical MQTT data, you can simply kill the nedb database and restart with the following commands:
$ pm2 stop all
$ rm mqtt.db
$ pm2 start all
Checking the logs
If you have any issues with the pm2 process, you can check the pm2 log via:
pm2 logsPress CTRL+C to exit the log browser.
Panic: Reinstalling pm2
If you really get stuck, you can kill and reinstall pm2 via:
sudo npm uninstall -g pm2
cd ~/.npm/ && sudo rm -rf pm2*
cd ~ && sudo rm -rf .pm2
sudo npm install pm2 -g
Then run through the setup process again.
Testing the System
At this point, you should have an MQTT broker running on port 1883 and a simple HTTP server listening on port 8080, which will display raw JSON records for all data published to the requested topic.
To test the system, you can publish a record to the MQTT broker from the
command-line with the following command (changing example.com to your own
domain name or IP address):
$ mqtt pub -h example.com -t test/topic -m 'Glorious Aedes!'If you point your browser to http://example.com:8080/test/topic you should get:
{
  "count": 1,
  "packets": [
    {
      "cmd": "publish",
      "brokerId": "NJ5yvRoIx",
      "brokerCounter": 2,
      "topic": "test/topic",
      "payload": "{\"type\":\"Buffer\",\"data\":[71,108,111,114,105,111,117,115,32,65,101,100,101,115,33]}",
      "qos": 0,
      "retain": false,
      "messageId": 0,
      "payloadString": "Glorious Aedes!",
      "payloadLength": 15,
      "timestamp": "2015-12-29T20:07:15.769Z",
      "_id": "LxqeAK00mXiB5peU"
    }
  ]
}
You can also see a log of all MQTT events by browsing to the root folder, which would be something like http://example.com:8080/
Tue Dec 29 2015 18:37:51 GMT+0000 (UTC)  disconnect   mqttjs_b5655c0c
Tue Dec 29 2015 18:37:51 GMT+0000 (UTC)  publish   mqttjs_b5655c0c test/topic
Tue Dec 29 2015 18:37:51 GMT+0000 (UTC)  connect   mqttjs_b5655c0c
Credits
A huge thanks to Uniontown Labs for the node source code, and help getting a simple test server up and running. Icons courtesy Maxim Basinski.